React needs no introduction. It has been one of the most popular front-end development frameworks for quite some time now. There are some core concepts of React that you need to know well in order to build a React App. However, this is not a React tutorial - building every application involves a certain thought process and in this article, we'll talk about the step-by-step thought process that goes into building a React Application. Following this thought process while building your React App will definitely help you to become a better React developer.
First of all, let's divide this whole process into stages - then we'll go through each stage separately. The whole process of building a React App involves the following stages:-
- Design/ Planning
- Static build
- Configuring state & data flow
- Testing
Let's start with the individual stages. In every stage, I'll talk about two things - what to do in that stage, and why is that stage useful.
1. The Design or Planning stage
The first stage starts when we have an idea about the product/app we are going to build so that we can start with planning or designing the UI.
What to do in this stage?
Start making a basic design of the UI. If you already have a designer or a design team handing over the design to you, great. If you are not too sure about the design, you can create a basic wireframe of the UI to get started. You can use design tools like Figma or Adobe XD etc. for making the design/wireframe. Now that's the first part.
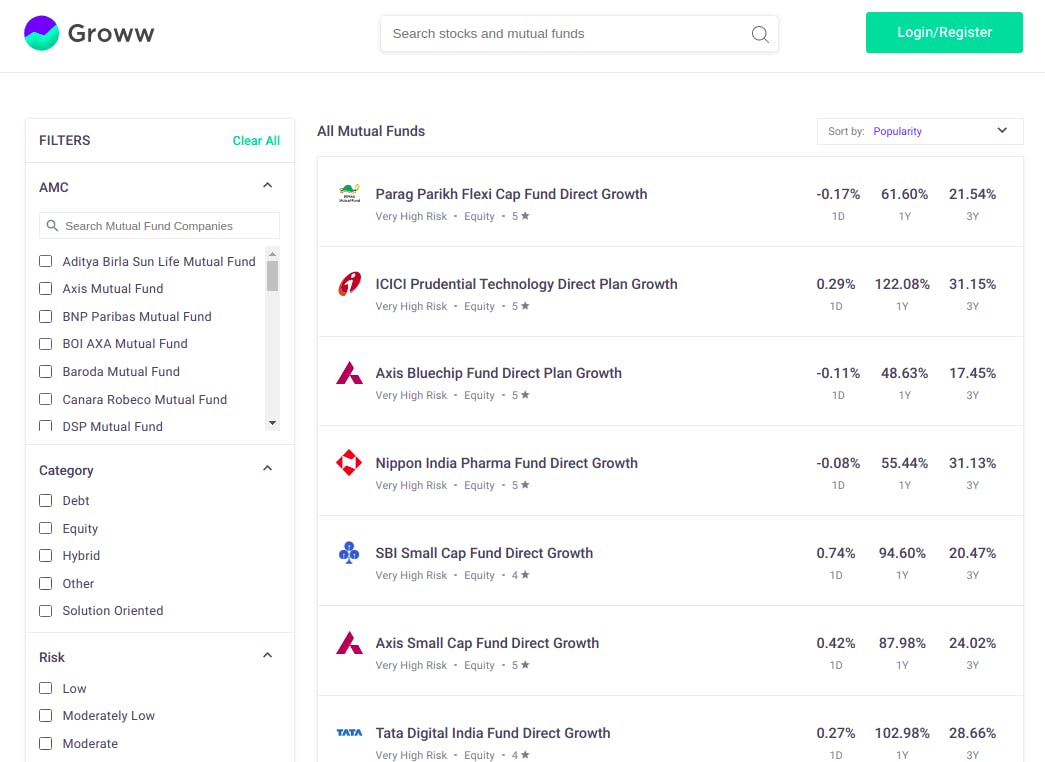
The second part is to divide the UI into separate components in the correct hierarchy. Ideally, we should divide your components in such a way that one component only has a single functionality. If we end up with components dealing with multiple things at a time, we should try to divide it further into sub-components. Another thing is, we must re-use any component if we can. Now, let's take an example of this page from Groww showing a list of Mutual Funds.
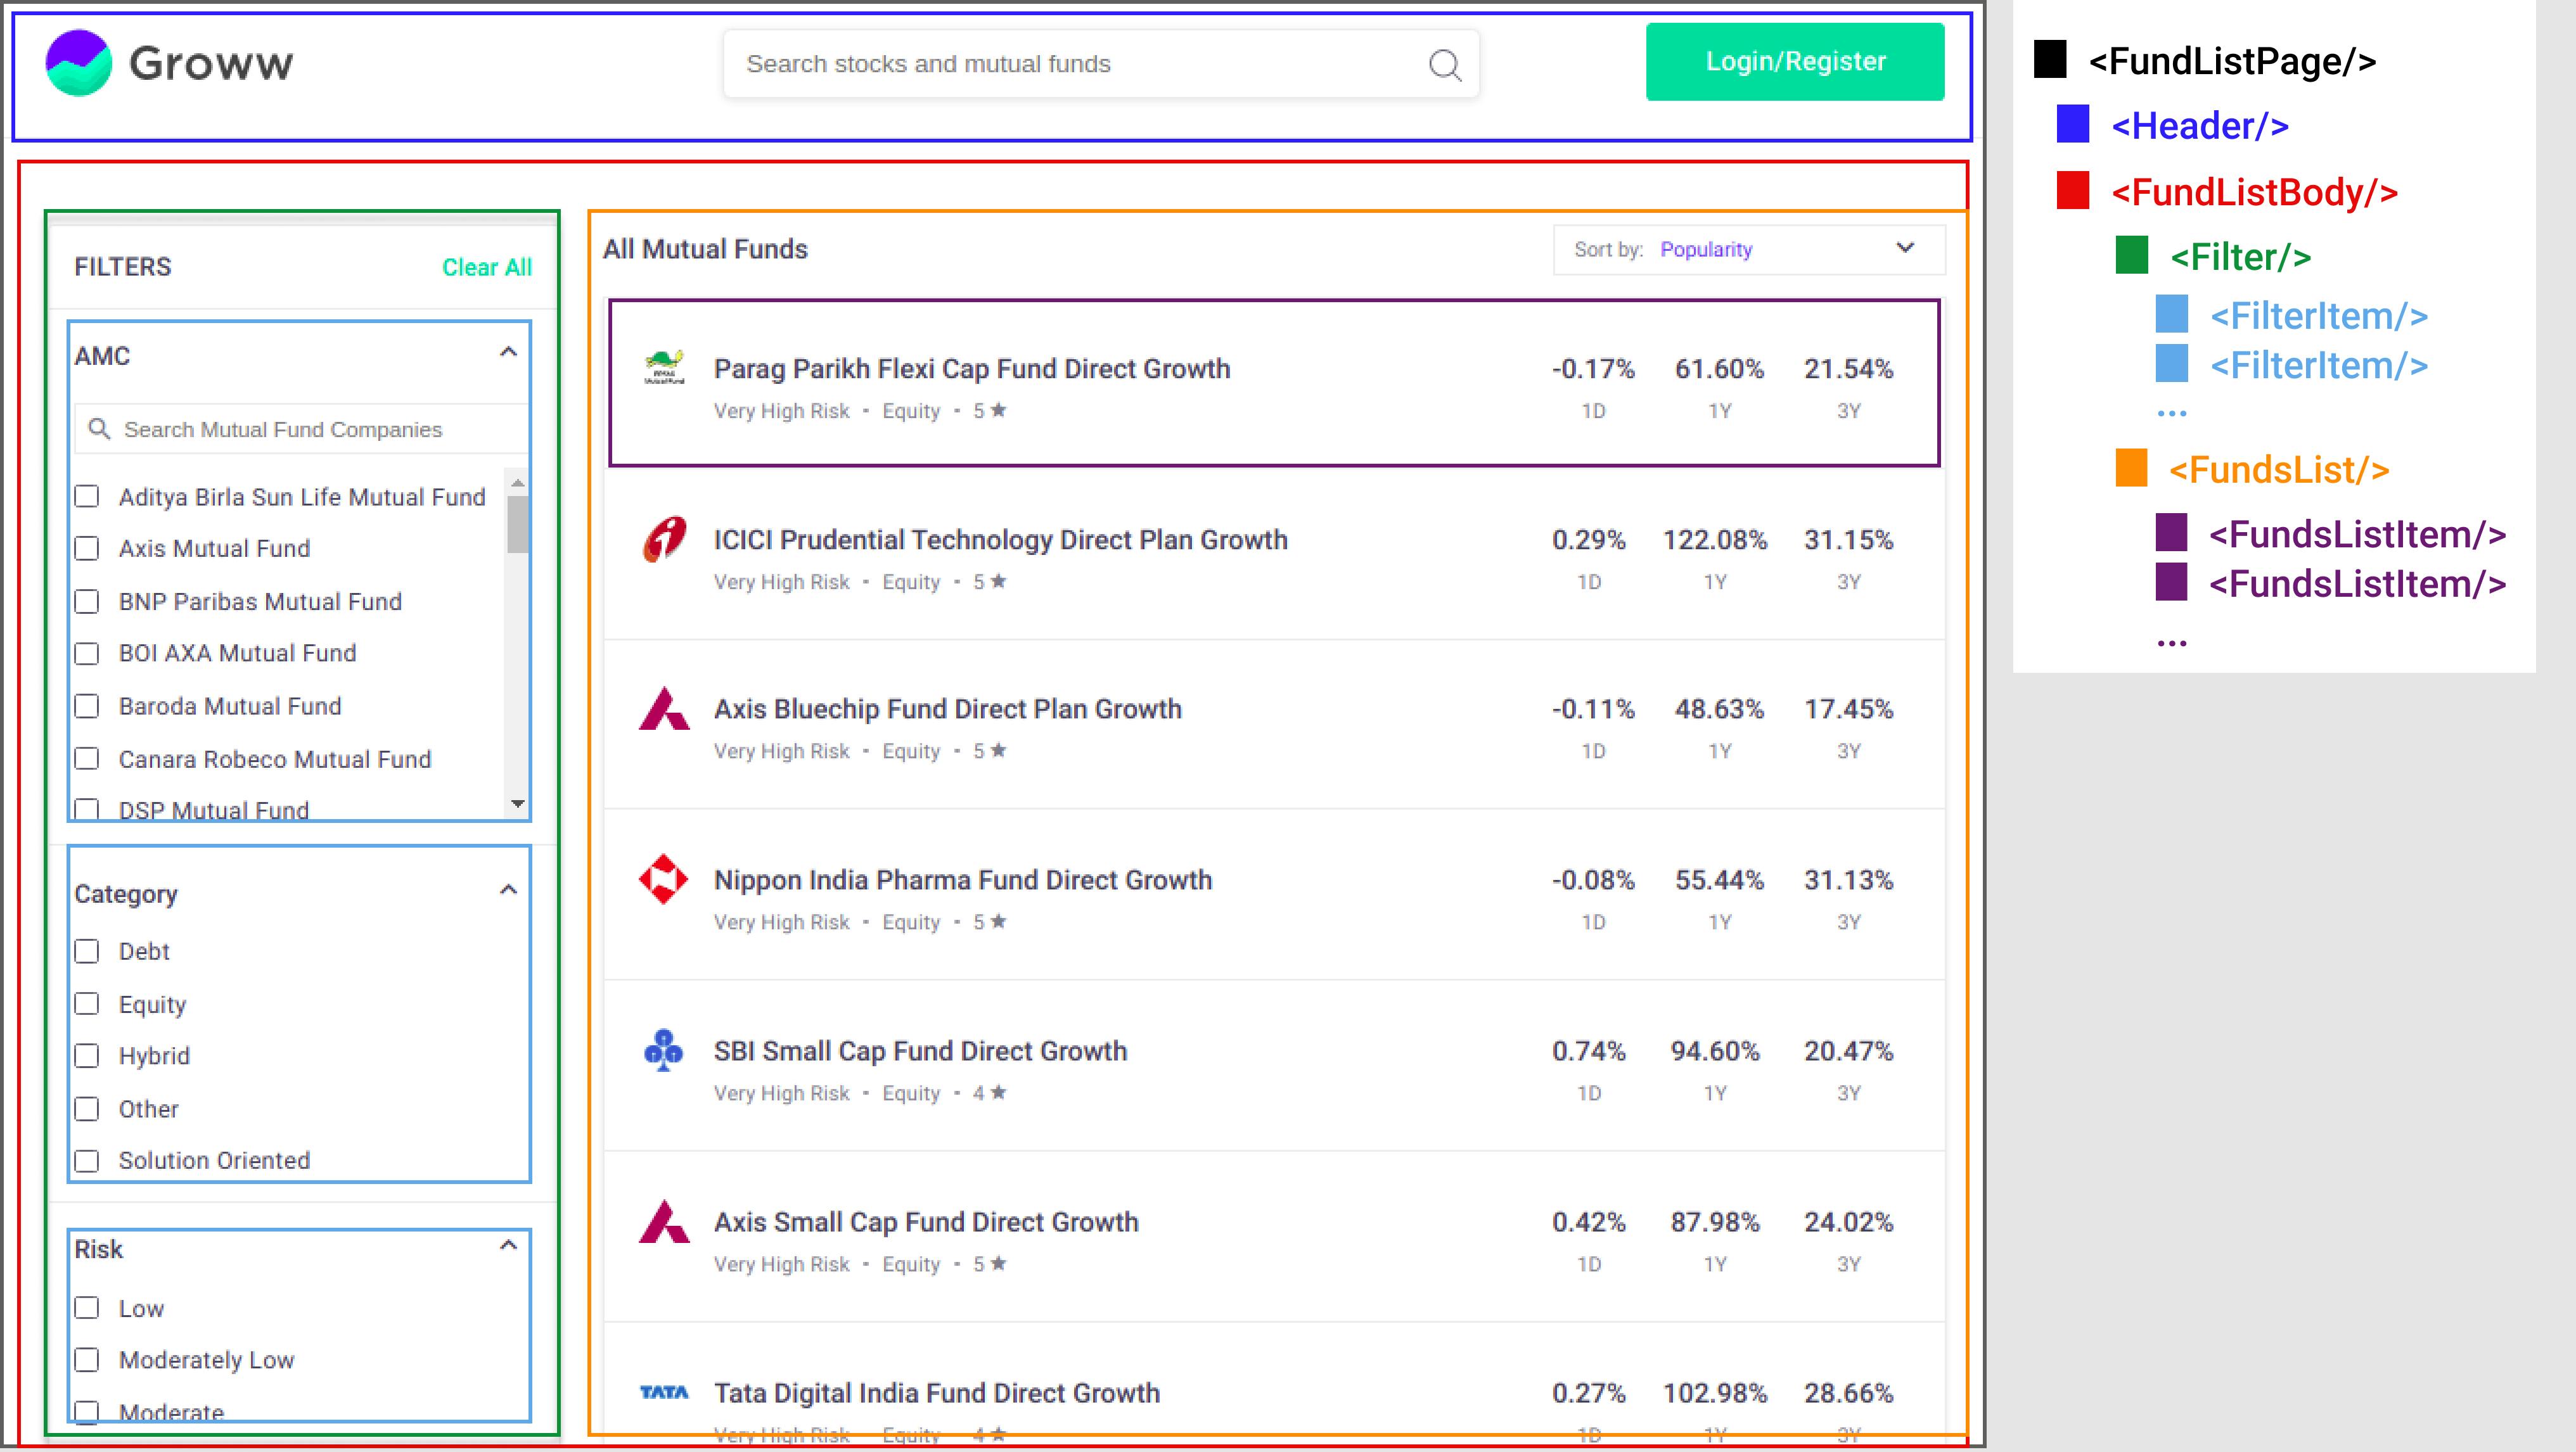
 If you had to divide this UI into components, how would you go about it? Of course, there is no one right way of doing it. Here's how I'd do it -

Now, we could also create separate components for the Search bar and the Login button in the header, as they are handling different functionalities. A very important part here is to name our components properly so that it's easy for everyone to understand and maintain. We should maintain a naming convention throughout the whole app as well. That's our first stage completed!
Why is this stage useful?
Through this stage, we can identify the different components and the component hierarchy of the app. This will be a great building block to proceed into the development part. Many of us can't wait to get into the development as soon as we get our hands on a project, but the planning stage will ultimately speed up our development process and save us from a significant amount of refactoring later, according to my own experience. Let's move on to the next stage!
2. Building a static version of the app
The second stage is to build a static version of the app.
What to do in this stage?
Now this stage requires a lot of typing and not so much thinking since we don't have to think about handling data or interactivity in this stage. This stage is just about building the folder structure, creating the components, adding styling, populating the components with mock data. For creating the components, you can follow a top-down(start with FundListPage in the above example) or bottom-up(start with FundListItem or FilterItem) approach. Generally, for smaller apps, the top-down approach works better and the bottom-up approach works well for larger apps.
Why is this stage useful?
The objective in this stage is to build the structure of the app and seeing how it would look like with real data, without having to worry about handling data and interactivity yet. Trying to deal with everything at the same time is more complex and slows down the process. Now we can shift our focus to data handling and interactivity completely.
3. Configuring state & data flow
In the third stage, we'll figure out the minimal state of our application requires and how the data flow works inside our app. This way we'll add interactivity to our app which we avoided in the last stage.
What to do in this stage?
Since this is a long stage, let's divide it into parts.
Firstly, we need to figure out what all data we need inside our application, and inside which component(s) should what data live. You can figure out this by looking at what data a particular component displays or utilizes. If we go back to our example, by looking at the FundsListItem component, we can say that all the data specific to a particular Mutual Fund like AMC Logo, Name, Category, Risk Profile, Rating, Returns should live inside this component.

Now, there are mainly three ways in which a particular piece of data can be used inside a React component -
- Local state
- Passed as props from parent
- Global state (by using Global Context or a state management library like Redux)
So, we need to figure out which case is better for which data and component. There's nothing like if we are using a global data store, all our data should be global. The choice should be based on the particular use case. A general overview:-
If a piece of data -> isn't passed as a prop from a parent component, or does change over time, or can't be derived from other state variables or props, then it should be stored as a state variable.
If some piece of data inside a component affects how some child component(s) should look/behave, then that should be passed on as a prop to the child.
Data that is used throughout the app and is required to be passed up or down a long chain of components should be inside a global store to avoid prop drilling.
Why is this stage useful?
This stage is very important for figuring out how we handle data and interactivity inside our app. Coming out with a minimal yet complete state is not easy as it might seem. The key here is to Not Repeat Ourselves. We should re-use existing states and components as much as possible. For example, if a certain data can be derived from passed props or exiting states or a combination of them, we don't need another state for that particular data. Reusability is a very useful feature that React provides while working with components, we must take full advantage of that!
Bonus: Inverse data flow
We know that data flow in react is unidirectional, i.e. we can only pass data down the component tree. But, we can use callbacks passed as props to children to update the state inside a parent component. We can use this to our benefit when required.
4. Testing our app
Now, finally, after we have configured and implementing the data flow and functionalities, it's time to test our app. Create React App comes with built-in testing libraries like React Testing Library and Jest. Writing tests is definitely a part a lot of devs (me included) initially skip. But, it's an essential part of development and will seem interesting once we get started with it.
What to do in this stage?
We'll write tests for all our functionality, UI, API calls, etc. in this stage. If you are getting started with testing, check out this awesome freecodecamp article about testing our React app with React Testing Library.
Why is this stage useful?
Test-Driven Development (TDD) is very much talked about these days, so I don't think I need to add anything about the usefulness of testing. Instead, I'll say what changed for me when I started writing tests. The more tests I wrote, the more confidence I had in my code. It gave me satisfaction to see those tests passing, as my code was behaving the way I wanted it to. We should treat every test as a clean slate, and maintain reusability by using functions like beforeEach, afterEach, beforeAll effectively.
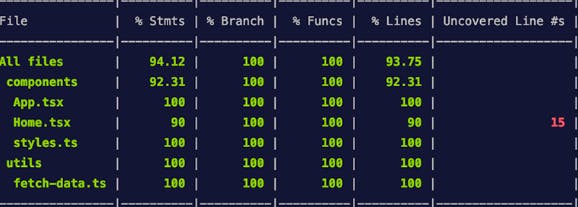
A screen like this will definitely add to your motivation! 😃 (Image courtesy: Google)

Now, if you are working with a large app and following the agile model, you can follow these four stages for all your features in isolation, and these will still hold well. Following this thought process has helped me become better at React and hopefully, it'll help you too! ❤️
Final words
Let me know below if I missed any points which you follow while developing in React, and which helped you become a better React dev! You can check out the 'Think in React' lesson from the React Docs, from which I got the idea of writing this article.
If you wanna get connected, I'm available on LinkedIn and Twitter. Catch you all next time! ✌️